Showing posts with label fashionsquash. Show all posts

The Best of FashionSquash 2013

Hey everyone,
This is a round up of the posts I did this year, from fashion to hair, I've enjoyed writing up posts for FashionSquash and vow to write millions more in 2014!
Hope you've all loved the posts I've put up this year and have fun looking back at them!

Don't forget to follow on bloglovin and twitter for updates in the New Year.
Thanks for all the support, readers and followers, I really and truly appreciate it!

Love Jesslyn x


BEAUTY


NAILS


HAIR


HAULS


REVIEWS

Cleaning My Make Up Brushes | FashionSquash's Helping Hand | Beauty Series


Hey everybody!


This is the fifth and last post of the beauty series (click if you missed the 1st post2nd post3rd post, 4th post or explanation post) and because it's the end of the series, I thought a how I clean my make up brushes would be the best way to end it.


Tools

Shampoo (You can use any type of cleaning product, not bleach or something crazy!)
Olive Oil
Towel or Kitchen Towel


1. Put a decent amount of shampoo in the palm of your hand.

2. Rub the brush in a circular motion, the dirt should be coming off into your hand.

3. Rinse off your hand, not brush. Repeat step number 2.

4. Rinse off the brush and your hand.

5. Put a teaspoon amount of olive oil into the palm of your hand and rub the brush in a circular motion until it is covered in the oil.

6. Put a teaspoon amount of shampoo into your hand and rub the brush in a circular motion.

7. Rinse out the brush making sure there's no soap or oil left in the brush.

8. Use a towel or kitchen towel and squeeze out any excess water in the brush.

9. Leave to dry, with the brush end pointing downwards.

10. Or on the edge of table! And now you have a clean and soft brush!

Tips

- Using olive oil makes the brush softer. 

- Letting the brush dry downwards stops the glue, holding the brush together, become weak.

- Wash your brushes regularly as dirty brushes hold bacteria and all the nasty stuff within the brush and you don't want to apply all that crap back onto your face!


There's a million and one ways to wash your brushes but I find this way to be most efficient.
I hope this helps you guys!

The Smoky Eye (for hooded eyelids) | FashionSquash's Helping Hand | Beauty Series


Hey everyone,

This is the fourth post of the beauty series (click if you missed the 1st post2nd post, 3rd post or explanation post) and it's going to be a smoky eye tutorial.
Doing a smoky eye can be quite tricky especially for those that have hooded eyelids as we don't actually have a crease to work on.
My way isn't the 'right' way but it definitely works and looks good, so here's my take on the smoky eye!


Make Up

MUA Glamour Nights Eye Shadow Palette - Shade 1, 3, 5, 7 (GN)
MUA Undressed Eye Shadow Palette - Shade 5 (U)
Maybelline Fit Me Foundation - Soft Honey
MUA Extreme Curl Mascara
MUA Intense Colour Eyeliner Pencil - Snow White

Tools

Real Techniques Pointed Foundation Brush & Detailer Brush
Superdrug Eye Shadow Brush
Blending Brush
w7 Angled Eyeliner Brush


1. Apply a primer or a base and then use your eye shadow brush and apply shade 3 (GN) just above the lash line.

2. Using a blending brush and shade 5 (U) blend it out, upwards. And then, using shade 5 (GN) blend out both, upwards.

3. Using shade 7 (GN) and an angled eyeliner brush, apply it along the top lash line and slightly blend it upwards with the same brush.

4. Using the same shade and brush, move towards the end of the lash line and make a line like as if you were doing a winged liner.

5. Try not to make the line to harsh as you will need to blend it out.

6. Blend the 'wing' into your crease, if you feel that it is too harsh or dark, blend it out with shade 5 (U).

7. Using the pointed foundation brush and some concealer, clean up from the bottom lash line.

8. Using a detailer brush, add shade 1 (GN) to the tear duct area.

9. And then use the white eyeliner pencil and apply it to the first third of the water line and add some mascara or false eyelashes.

And you're good to go!

Tips

- Applying mascara or false eyelashes helps open up the eyes.

- Avoid using shimmery eye shadows on the hooded area as it emphasises them.

- White eye shadow or eyeliner in the corner of the eye or on the water line makes the eye seem brighter & more open.

- Concealing upwards from the bottom lash line helps lift the eyes.


Hope this has helped you lovelies with your smoky eye!
Let me know if it helped!

Thanks for reading!

Winged Liner | FashionSquash's Helping Hand | Beauty Series


Hey everyone!

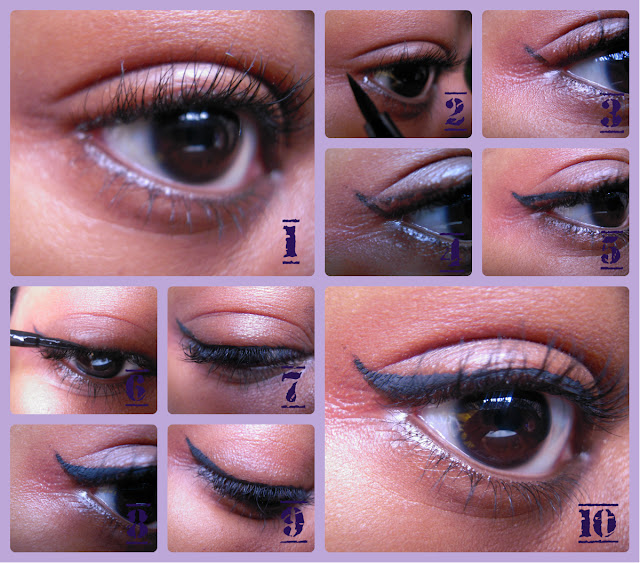
 This is the third post of the beauty series (click if you missed the 1st post, 2nd post or explanation post) and it's going to be a tutorial on how to do a winged liner.
I'm not any kind of expert but I feel like this is an easy way of getting an amazing wing!
Here we go!

Make Up


2True Effortless Eyeliner
w7 Automatic Fine Eyeliner Pen


 1. Comb out your eyelashes or use an eyelash curler to make sure all your eyelashes are facing the same direction.

2. Line up the eyeliner pen with your bottom lash line.

3. Lightly draw a straight line upwards, however long you want it to be.

4. From the top of the line, lightly draw a line down towards the lash line.

5. Go over the the lines you've drawn to darken them if you need to.

6. Hold the the eyeliner pen horizontally and press it along the top lash line, from the inner corner to the wing you've drawn.

7. Depending on your eye type, you can decide how thick you want the line across the lid.

8. Fill in the wing.

9. Join up the wing with the line you've drawn to give it smooth look.

10. All done!

 Tips

 - Make sure you know what type of winged liner suits your eye type, it makes a difference.

- Figure out whether an eyeliner pen or a liquid eyeliner is better for you.

-Practice makes perfect, if you keep doing it, it gets easier.


Hope this has helped you lovelies with applying your winged liner!
Let me know if it helped, thanks for reading!

Applying Eyeshadow For Hooded Eyelids | FashionSquash's Helping Hand | Beauty Series


Hello!

This is the second post of the beauty series (click here if you missed the first post and here if you missed the explanation post) and it's a eye shadow tutorial for those that have hooded eyelids. Hooded eyelids can be a pain but why not rock it with some killer eye shadow?

Let's get started!


Tools & Make Up

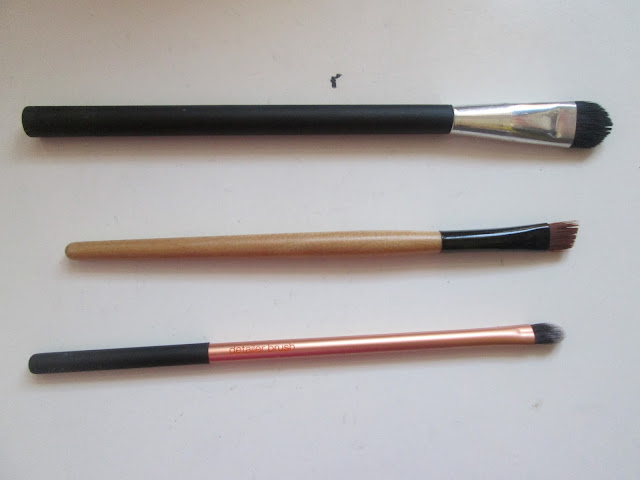
Superdrug Blending Brush
w7 Angled Eyeliner Brush
Real Techniques Detailer Brush
MUA Glamour Nights Palette - Shade 3, 4, 11
MUA Undressed Palette - Shade 5
Maybelline FIT Me Foundation 315 Soft Honey (not pictured, sorry!)


1. Apply a primer or a base colour all over the lid.
 
2. Using an eye shadow brush, apply shade 11 from the inner corner to two thirds of the lid.
 
3. Using shade 3, gently pat it onto the outer edge of the lid.
 
4. Without adding anymore eye shadow onto the brush, blend the eye shadow upwards and into the crease of the lid.
 
5. Using shade 5, blend out shade 3 into the brow bone to make sure there isn't any harsh lines.
 
6. With the detailer brush, apply shade 4 from the tear duct to about a third of the bottom lash line.
 
7. Using concealer (or a lighter foundation), follow your bottom lash line upwards and draw a line with the concealer and blend it out.
 
8. This is the stage where you would add some liquid eyeliner. (I didn't because I wanted the eye shadow to be the focus!)
 
9. Put some mascara on or eyelashes (or both!) whatever you prefer!
And there you have it, some lovely eye shadow!

Tips

Don't do too much crease work because once you open your eyes, it's going to be hidden.
Applying lots of mascara or lashes can help open up the eyes.
Concealing upwards from the lash line also helps lift the eyes.
Applying a bright colour eye shadow on the bottom lash line open up the eyes too, white eyeliner is also great.
I hope this helped you lovely ladies.
If you try this look, tweet me some pictures on twitter @JesslynJuly, I'd love to see them!
Thanks for reading!

New Blog Series - FashionSquash's Helping Hand

Hey everyone,

Thought I would do something a little different for August. Every Friday starting the 2nd of August I will be doing a post for the FashionSquash's Helping Hand series.

This series is basically going to be tutorials. For the month of August, I'll be doing a beauty series. From how I do my eyebrows to cleaning my make up brushes!

I'm very excited to do this series as it's very different to what I usually do.

What do you guys think? You excited?
Stay tuned!


Disclaimer - This series is based on how I do things, that work for me, they may or may not work for you.
So please, please make sure it is suitable for you before trying anything.
Thank you.
Related Posts Plugin for WordPress, Blogger...