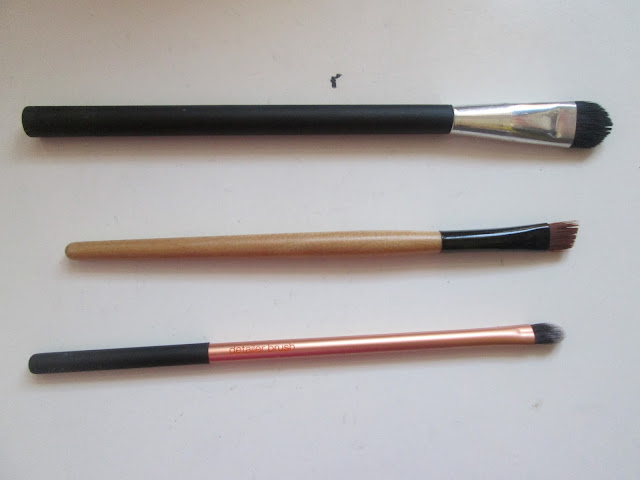
Cleaning My Make Up Brushes | FashionSquash's Helping Hand | Beauty Series


Hey everybody!


This is the fifth and last post of the beauty series (click if you missed the 1st post2nd post3rd post, 4th post or explanation post) and because it's the end of the series, I thought a how I clean my make up brushes would be the best way to end it.


Tools

Shampoo (You can use any type of cleaning product, not bleach or something crazy!)
Olive Oil
Towel or Kitchen Towel


1. Put a decent amount of shampoo in the palm of your hand.

2. Rub the brush in a circular motion, the dirt should be coming off into your hand.

3. Rinse off your hand, not brush. Repeat step number 2.

4. Rinse off the brush and your hand.

5. Put a teaspoon amount of olive oil into the palm of your hand and rub the brush in a circular motion until it is covered in the oil.

6. Put a teaspoon amount of shampoo into your hand and rub the brush in a circular motion.

7. Rinse out the brush making sure there's no soap or oil left in the brush.

8. Use a towel or kitchen towel and squeeze out any excess water in the brush.

9. Leave to dry, with the brush end pointing downwards.

10. Or on the edge of table! And now you have a clean and soft brush!

Tips

- Using olive oil makes the brush softer. 

- Letting the brush dry downwards stops the glue, holding the brush together, become weak.

- Wash your brushes regularly as dirty brushes hold bacteria and all the nasty stuff within the brush and you don't want to apply all that crap back onto your face!


There's a million and one ways to wash your brushes but I find this way to be most efficient.
I hope this helps you guys!

Plum Wine


LA Colors Nail Lacquer with Hardeners - Plum Wine

Hello lovelies!

As you can see by the colour of my nails, you can tell that I want autumn to begin now. Summer's done for me, I've had a 2 month summer holiday and summer is boring me.
Fashion to make up, I can't wait for that change.

Back to the nails. I really love LA Colors' nail polishes mainly because of the wide range of colours and the fact that they have hardeners in them.
Whenever my nails feel weak, I whip out their nail polishes. My nails literally don't go anywhere, even after having them in water for a long period of time.

It took 2 coats to get this colour, if I only applied 1 coat you'd be able to see my nails through the nail polish.
One thing I hate is sitting still, waiting for nails to dry. This nail polish dries insanely quick, I'm always shocked when I check to see if they're dry and they are.

The only downside is that it doesn't last very long, maybe around 2-3 days which is annoying but I don't mind that much cause I can re-apply and it will dry super quick.

Overall, I love this nail polish, the colour and all!

What colours are you going to be using this A/W guys?
Whose looking forward to Autumn?

Thanks for reading!

OOTD: Just chillin'


Adidas Jumper
Jeans - New Look
Nike Air Forces
Rings (Pack of 4) - Primark
Thermal Mug & Purse- Primark
Lips - NYC Lipstick - 437 Modern Love & MUA Plumping Lip Gloss - Nude

The Smoky Eye (for hooded eyelids) | FashionSquash's Helping Hand | Beauty Series


Hey everyone,

This is the fourth post of the beauty series (click if you missed the 1st post2nd post, 3rd post or explanation post) and it's going to be a smoky eye tutorial.
Doing a smoky eye can be quite tricky especially for those that have hooded eyelids as we don't actually have a crease to work on.
My way isn't the 'right' way but it definitely works and looks good, so here's my take on the smoky eye!


Make Up

MUA Glamour Nights Eye Shadow Palette - Shade 1, 3, 5, 7 (GN)
MUA Undressed Eye Shadow Palette - Shade 5 (U)
Maybelline Fit Me Foundation - Soft Honey
MUA Extreme Curl Mascara
MUA Intense Colour Eyeliner Pencil - Snow White

Tools

Real Techniques Pointed Foundation Brush & Detailer Brush
Superdrug Eye Shadow Brush
Blending Brush
w7 Angled Eyeliner Brush


1. Apply a primer or a base and then use your eye shadow brush and apply shade 3 (GN) just above the lash line.

2. Using a blending brush and shade 5 (U) blend it out, upwards. And then, using shade 5 (GN) blend out both, upwards.

3. Using shade 7 (GN) and an angled eyeliner brush, apply it along the top lash line and slightly blend it upwards with the same brush.

4. Using the same shade and brush, move towards the end of the lash line and make a line like as if you were doing a winged liner.

5. Try not to make the line to harsh as you will need to blend it out.

6. Blend the 'wing' into your crease, if you feel that it is too harsh or dark, blend it out with shade 5 (U).

7. Using the pointed foundation brush and some concealer, clean up from the bottom lash line.

8. Using a detailer brush, add shade 1 (GN) to the tear duct area.

9. And then use the white eyeliner pencil and apply it to the first third of the water line and add some mascara or false eyelashes.

And you're good to go!

Tips

- Applying mascara or false eyelashes helps open up the eyes.

- Avoid using shimmery eye shadows on the hooded area as it emphasises them.

- White eye shadow or eyeliner in the corner of the eye or on the water line makes the eye seem brighter & more open.

- Concealing upwards from the bottom lash line helps lift the eyes.


Hope this has helped you lovelies with your smoky eye!
Let me know if it helped!

Thanks for reading!

Current Favourites


Sleek Contour Kit - Medium
MUA Lipstick - Shade 3
DHC Deep Cleansing Oil
Hask Argan Oil
Real Techniques Buffing Brush
MUA Extreme Curl Mascara
Ring - Primark
Hey guys,
I haven't done a favourites post in a while and there's been quite a few things I've been loving recently.
Fashion wise, there hasn't been something that I've been constantly wearing that I haven't put in a previous favourites post.
So this is basically a beauty favourites post!
  Let me just get this out the way, I love the Real Techniques brushes, they really are great brushes and are worth the price. My current favourite is the buffing brush from the Core Collection. I use it to apply my liquid foundation and it does a great job, I've abandoned my foundation brush for this beauty.

I'm so happy I purchased the Sleek Contour Kit, I'm not a huge contour-er but I love adding that extra definition to my face and it's so easy with this contour kit.

MUA is one of my favourite make up brands, I love everything about MUA, their price range, quality and variety.
I purchased the MUA Extreme Curl Mascara a few months ago, I also did a review on it. I really, really like it, it doesn't clump my eyelashes together and all that rubbish. I already have really curly eyelashes but this mascara gives it length too.
Also, the MUA lipstick in shade 3 has been a favourite, it's a great summer colour and is great for when you don't have a lot of eye make up on and just need something to complete the look. It also looks great with lip gloss on top.

Oils.

The deep cleansing oil has been giving me life, my Lord, rubbing some of that on top of your make up, leave it on for a couple minutes, wipe it off, make up gone. I can't wait to review this product.
My face has been feeling very clean since I started using it, I'm trying to get better with my skincare and this product is helping me! Keep your eyes peeled for a review coming soon!

Hask Argan Oil. I've been talking more about my hair recently and how hard it can be to manage, even though I texturized it. My hair is so thick and can be a pain sometimes, I wash it weekly to keep it tamed and it can be very dry. I dyed it a burnt orange, (hoping for a gingery colour and failing) and it was very, very dry. I couldn't take it. A day later, I deep conditioned it, washed it, conditioned it and drenched it with this argan oil, my hair regained life, thank Jesus! Every time I wash my hair, I add a little bit of this oil and it gives it that extra shine and moisture. (Thanks Kelly, I won this in your giveaway!)

The ring is a huge favourite of mine, you lovely readers are probably tired of seeing this ring in my OOTD's but I can't help it! It adds that extra edge, I'm really starting to love gold jewellery!

Any of these been your current favourite? Anything you'd recommend?
Thanks for reading!

Jesslyn x

Mini Haul


L'Oreal Skin Perfection 3 in 1 Micellar Solution
Superdrug Deep Action Blackhead Anti Bacterial Scrub
Nivea Lipstick - Aubergine
w7 Automatic Fine Eyeliner
Necklaces & Rings - Primark

Bonjour!

Don't know where the French came from but I have another haul for you guys!
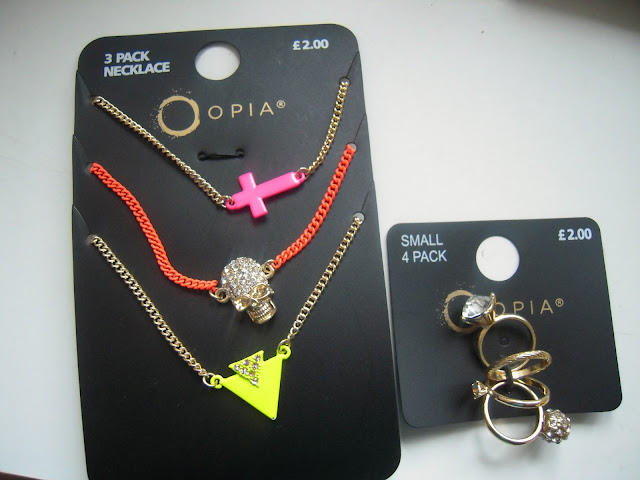
I know I did a haul two weeks ago but it's so hard not to shop when there's so many good things to buy *sigh*

I stopped off at Primark first, to look at their bags and tops but I got sidetracked by the jewellery and didn't even reach the tops on the other side, however I was with my little brothers (yes, plural) and had to head to the men's/boy's section, got to say, there are some great jumpers in the men's section!

As I was on my way to Superdrug, I was stopped by a pop up stall that sell discounted branded make up and other brands such as w7.
I picked up a dark purple lipstick by Nivea(?) I was so confused, does Nivea do lipsticks or am I just really, really behind? I've been wanting some dark lipsticks for a/w and was happy to find the shade I wanted.
I also picked up a felt tip eyeliner pen to replace the one that I'd lost on my last shopping trip.

By now, my brothers were getting irritated and were running around the stall, stopping by me as they went round saying 'when are we gonna go to JD, when are we gonna go to JD?' (This is why I shop by myself!)

So we headed to JD Sports first, just to keep the peace, even though we'd pass Superdrug on our way there, my brothers did their thing and I had a little look at the trainers and mentally figured out which two pairs I wanted before the start of college. I need new trainers in my life!

Now to Superdrug, I started off by looking at different foundations and eye shadow palettes but nothing really excited me, I remembered that I'd tweeted (@JesslynJuly) a week ago that I needed to delve deeper into the world of skincare so I started looking at the skincare section, I'd read so many reviews on the L'Oreal Micellar Solution so I picked it up as it was on sale and thought I'd give it a try, can't wait to try it and give you guys my verdict.
I was also on the look out for a new scrub as I'd been using the Escenti Tea Tree Facial Gel Scrub that my mum buys, for a while and wanted a change. I found Superdrug's Anti Bacterial Scrub and saw that it had that key ingredient 'salicylic acid' so I picked that up.
By this time, my brothers had disappeared and then 5 seconds later, the youngest came back to me, crying, saying that the oldest sprayed perfume on his lips and it was burning. I knew it was time to go home!

That was my haul, it was more like a story of my shopping trip haha!

Have you lovelies picked up any great bits recently? Any skincare products that are great for oily skin?
Any reviews?

Let me know!
Thanks for reading!

Winged Liner | FashionSquash's Helping Hand | Beauty Series


Hey everyone!

 This is the third post of the beauty series (click if you missed the 1st post, 2nd post or explanation post) and it's going to be a tutorial on how to do a winged liner.
I'm not any kind of expert but I feel like this is an easy way of getting an amazing wing!
Here we go!

Make Up


2True Effortless Eyeliner
w7 Automatic Fine Eyeliner Pen


 1. Comb out your eyelashes or use an eyelash curler to make sure all your eyelashes are facing the same direction.

2. Line up the eyeliner pen with your bottom lash line.

3. Lightly draw a straight line upwards, however long you want it to be.

4. From the top of the line, lightly draw a line down towards the lash line.

5. Go over the the lines you've drawn to darken them if you need to.

6. Hold the the eyeliner pen horizontally and press it along the top lash line, from the inner corner to the wing you've drawn.

7. Depending on your eye type, you can decide how thick you want the line across the lid.

8. Fill in the wing.

9. Join up the wing with the line you've drawn to give it smooth look.

10. All done!

 Tips

 - Make sure you know what type of winged liner suits your eye type, it makes a difference.

- Figure out whether an eyeliner pen or a liquid eyeliner is better for you.

-Practice makes perfect, if you keep doing it, it gets easier.


Hope this has helped you lovelies with applying your winged liner!
Let me know if it helped, thanks for reading!

Trainers Trend

Nike Air Max 90
Adidas Originals Nizza Lo
Nike Air Force 1 Lo
Puma Suede
Hey everyone,
I haven't done a trends post in a while so I thought why not share with you guys a little trend that's floating about.
Trainers.
Recently, the whole sporty look has taken over the fashion world (along with strappy sandals!) and trainers are being worn with everything. Trainers are my thing, I'm so happy that wearing trainers with, literally, everything is a normal thing now.

A huge variety of trainers are hitting the stores and I'm definitely in my zone.
(Anybody that looks at me sideways because I'm wearing a dress with the most boyish of trainers just isn't with it .hmph.)

There are so many trainers on my shopping list and my mum's getting sick of it, she says 'what do you need them for?', I say, 'to wear, obviously!'
I never wear flats, if I do, it's because I've been forced to, it's either trainers or heels and the occasional, sandal in summer.
 Trainers are super easy to style, whether you want to make a skater dress look less girly or if you want to dress down an outfit, trainers are the thing to throw on!

What do you lovelies think about this trend?

Hope you're all well and thanks for reading!

OOTD: Making It Big in Fashion


Apologies for the quality of the photos and rubbish scenery!

Crop Top - Primark
Blazer - Femme Connection
Floral Skirt - Primark
Bag & Socks - Primark
Shoes - Nike Air Forces
Ring & Necklace - (last year Christmas presents!)

Applying Eyeshadow For Hooded Eyelids | FashionSquash's Helping Hand | Beauty Series


Hello!

This is the second post of the beauty series (click here if you missed the first post and here if you missed the explanation post) and it's a eye shadow tutorial for those that have hooded eyelids. Hooded eyelids can be a pain but why not rock it with some killer eye shadow?

Let's get started!


Tools & Make Up

Superdrug Blending Brush
w7 Angled Eyeliner Brush
Real Techniques Detailer Brush
MUA Glamour Nights Palette - Shade 3, 4, 11
MUA Undressed Palette - Shade 5
Maybelline FIT Me Foundation 315 Soft Honey (not pictured, sorry!)


1. Apply a primer or a base colour all over the lid.
 
2. Using an eye shadow brush, apply shade 11 from the inner corner to two thirds of the lid.
 
3. Using shade 3, gently pat it onto the outer edge of the lid.
 
4. Without adding anymore eye shadow onto the brush, blend the eye shadow upwards and into the crease of the lid.
 
5. Using shade 5, blend out shade 3 into the brow bone to make sure there isn't any harsh lines.
 
6. With the detailer brush, apply shade 4 from the tear duct to about a third of the bottom lash line.
 
7. Using concealer (or a lighter foundation), follow your bottom lash line upwards and draw a line with the concealer and blend it out.
 
8. This is the stage where you would add some liquid eyeliner. (I didn't because I wanted the eye shadow to be the focus!)
 
9. Put some mascara on or eyelashes (or both!) whatever you prefer!
And there you have it, some lovely eye shadow!

Tips

Don't do too much crease work because once you open your eyes, it's going to be hidden.
Applying lots of mascara or lashes can help open up the eyes.
Concealing upwards from the lash line also helps lift the eyes.
Applying a bright colour eye shadow on the bottom lash line open up the eyes too, white eyeliner is also great.
I hope this helped you lovely ladies.
If you try this look, tweet me some pictures on twitter @JesslynJuly, I'd love to see them!
Thanks for reading!
Related Posts Plugin for WordPress, Blogger...